Changing a showerhead is one of the easiest yet most effective ways to enhance your bathroom experience. Whether you’re upgrading for aesthetics, improved water flow, or eco-friendliness, installing a new showerhead doesn’t require a professional plumber. With just a few tools and a bit of time, you can have a fresh, fully functioning showerhead in place. This guide explores everything you need to know about how to install a new showerhead, from selecting the right model to ensuring a leak-free finish.
Choosing the Right Showerhead for Your Needs
Before installation begins, it’s important to select a showerhead that meets your specific preferences. There are many types available, ranging from fixed models and handheld units to rain showers and multi-function designs. Consider whether you want a high-pressure spray for a refreshing blast or a gentle stream for relaxation. Look for models that offer water-saving features if conservation is a priority.
Material and finish also play a role. Chrome, brushed nickel, and oil-rubbed bronze are common finishes that can match your existing fixtures. Make sure the showerhead you choose is compatible with your current plumbing setup to avoid unnecessary modifications.
Gathering the Necessary Tools and Supplies
Installing a showerhead doesn’t require a wide array of tools. The basics include an adjustable wrench or pliers, plumber’s tape (also known as Teflon tape), and a cloth or rag to protect the finish of the fixture. In some cases, you may also need a step stool or ladder if the fixture is mounted high.
Make sure the water supply to the shower is turned off before starting any work. Although you won’t be accessing the main water line, it’s best to prevent unexpected sprays or drips by ensuring the shower valve is off.
Removing the Old Showerhead Safely
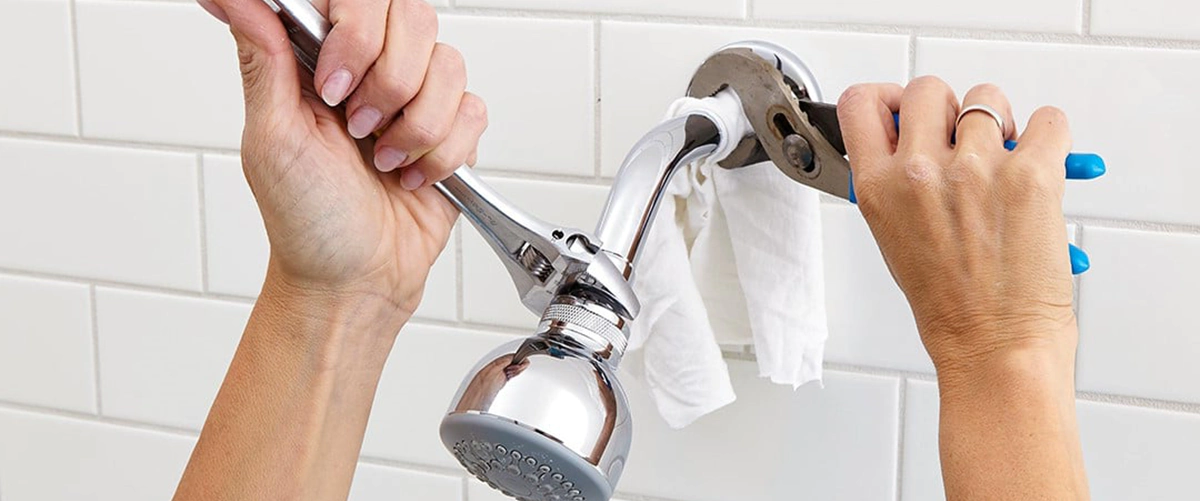
To begin the process, remove the existing showerhead by gripping the base with a wrench or pliers. Wrap a cloth around the shower arm to protect the finish if necessary. Turn counterclockwise to loosen and detach it. Some older showerheads might be corroded or tightly fixed due to mineral buildup, so applying a bit of penetrating oil and waiting a few minutes can make removal easier.
Once removed, inspect the shower arm for any remaining plumber’s tape, debris, or corrosion. Clean the threads thoroughly using a dry cloth or small wire brush. This ensures a secure connection for the new showerhead and helps prevent leaks.
Preparing the Shower Arm for Installation
After cleaning, wrap fresh plumber’s tape around the threads of the shower arm. This creates a watertight seal and makes it easier to screw on the new fixture. Wrap the tape clockwise to match the direction the showerhead will be turned when attached. Two to three full wraps are usually sufficient.
Avoid over-wrapping, as this can make the threads too bulky, potentially causing cross-threading or a poor fit. Make sure the tape is applied smoothly and tightly, without gaps or folds.
Attaching the New Showerhead Correctly
With the threads wrapped, screw the new showerhead onto the shower arm by hand. Start gently to avoid misalignment. Once the threads catch and the fixture feels snug, tighten further with an adjustable wrench if needed. Protect the finish of the new showerhead by placing a cloth between it and the tool.
Do not overtighten, as this can strip the threads or damage the fitting. Tighten just enough to ensure the connection is firm and secure. Many showerheads come with built-in washers or seals, so adding additional sealing material may not be necessary.
Testing the Installation for Leaks
Once the showerhead is attached, turn on the water supply and test the fixture. Let the water run for a minute and observe the connection point closely. If you notice any drips or moisture around the joint, turn off the water and tighten the showerhead slightly more.
In cases where tightening doesn’t stop the leak, remove the fixture, reapply fresh plumber’s tape, and try again. Persistent leaks may indicate a damaged shower arm or incompatible threading, in which case further inspection may be needed.
Installing a Handheld Showerhead Variant
 For those opting for a handheld model, the process includes an additional step of attaching a mounting bracket or diverter. These parts usually come with the unit and are installed between the shower arm and the hose.
After mounting the bracket, connect the hose to the bracket and the handheld head to the other end. Hand-tighten all connections and apply plumber’s tape as needed. Many handheld models also include suction cups or wall mounts for added convenience.
Once assembled, test both the fixed mount and the handheld wand for water flow and leaks. Make sure the hose hangs naturally and doesn’t create tension or interfere with movement.
Considering Water Pressure and Flow Restrictions
Modern showerheads often include flow restrictors to limit water usage and promote efficiency. While this is beneficial for conservation, it can sometimes result in low pressure, especially in homes with already limited water flow.
Some users choose to remove the flow restrictor for a stronger spray, although this can impact water bills and may violate local plumbing codes. If better pressure is important, look for models that are specifically designed to perform well under low-pressure conditions.
Maintaining the New Showerhead Over Time
Once installed, proper maintenance can extend the life of your showerhead and keep it performing well. Mineral deposits from hard water can clog nozzles over time, reducing flow and efficiency. Regularly soaking the head in a vinegar solution or using a commercial descaler helps keep it clean and functional.
Inspecting the connection occasionally ensures the seal remains intact. Replacing plumber’s tape and retightening the head annually can prevent leaks and maintain optimal performance.
For handheld units, check the hose for kinks or wear and replace it if flexibility decreases. A poorly functioning hose can reduce mobility and cause strain on the mounting bracket.
Upgrading Additional Shower Components
While changing the showerhead is a quick win, you may also consider upgrading other fixtures like the shower arm, flange, or diverter valve at the same time. These changes can modernize your bathroom’s look and improve functionality.
Shower arms come in different lengths and angles, allowing for a more personalized experience. Some models curve upward to accommodate rain showerheads, offering a more luxurious experience without requiring ceiling mounting.
Flanges cover the hole where the shower arm enters the wall and can be replaced for aesthetic purposes. Newer models can help provide a cleaner, more finished look.
Safety Considerations and Common Mistakes
When working with plumbing fixtures, safety and precision are key. Always use tools carefully to avoid damaging surrounding tiles or fixtures. Never use excessive force during removal or installation, as this can cause leaks or cracks in pipes hidden behind walls.
Avoid skipping steps like cleaning the threads or using plumber’s tape. These small measures make a significant difference in ensuring the longevity of your installation. If your showerhead doesn’t fit properly or feels loose, double-check the model specifications and threading compatibility.
For households with unusually high water pressure, installing a pressure regulator can help protect your fixtures from wear and tear. On the other hand, if your pressure is too low, you may want to consult a professional to explore options for boosting it effectively.
When to Call a Professional Plumber
Most showerhead installations are DIY-friendly, but certain circumstances may require professional help. If the shower arm is leaking inside the wall or shows signs of damage, or if you’re upgrading to a ceiling-mounted rain shower, it’s best to call in a plumber.
Similarly, if you’re combining your installation with a complete bathroom remodel or if you encounter unusual water pressure issues, professional guidance ensures the work meets safety standards and building codes.
A Simple Upgrade with Lasting Benefits
Installing a new showerhead is a straightforward project that can dramatically improve your daily routine. With the right tools, a little patience, and some basic knowledge, anyone can complete this home upgrade with confidence. A properly installed showerhead provides years of reliable service, enhances your bathing experience, and even saves water when chosen wisely.